Man'o'man... What a time to be a Star Wars fan huh? Star Wars: Episode VII - The Force Awakens comes out on blu-ray and the Rogue One trailer drops online (covered in a separate post). What better way to celebrate it then get another scenario of X-Wing in with my friend/nemesis Drew?
As a rule, Drew and I established that as we go through the scenarios, we will swap out who plays which side. Last time I played the plucky Rebels and Drew played the might of the Imperial Navy. The result ended up with a nail-biting ending with the Rebels destroying the Gozanti-class
Patrol Carrier
Vector. Now on the heels of a bitter defeat, the Imperial forces in the sector regroup at the
Vector's sister-ship, the
Requiem. Despite the loss, the Imperial commander of the
Requiem proceeds with actionable intelligence to stop an independent freighter with suspected ties to the Rebels in the sector.
Overview
Scenario 2 is the initial root for the future branching scenarios of the
Imperial Crackdown campaign. In this one, the Rebels are going to do their best impression of GTG - Grand Theft Gozanti. Wasn't bad enough they blew up the last one, now they want to rub it in and steal one to go cruising in. See, this is why we can't have nice things.
Forces:
Imperial Forces (Tioch)
- Gozanti-class w/ Docking Clamps, Broadcast Array, DLT, and Requiem title
- "Omega Leader" TIE/FO w/ adaptability (inc to PS9)
- "Omega Ace" TIE/FO w/ Push The Limit
- Epsilon Sqd Pilot TIE/FO
Rebels (Drew)
- "Kanan Jarrus" VCX-100 w/ "Ghost", "Chopper", Recon Spec., Ion Turret, & Adv. Sensors (Wing Leader)
- "Sabine Wren" Atk Shuttle w/ Twin Laser Turret (TLT)
- Blue Squadron Novice T-70 X-wing
Objective:
- Imperials - Time for some stern parenting! The Rebels cannot drive the Gozanti tonight to the movies. Knock out the Wing Leader or the Gozanti must survive 10 rounds of the Rebels asking if they can drive.
- Rebels - Secure the keys to the Gozanti so they can go pick up their girlfriend!
Pregame Thoughts (NEW SECTION!)
- Tioch - Overall, I know in a stand-up fight the Gozanti will not last long against the Ghost so I have to focus as much fire on it as I can. I had debated using some cheap 18 pt Interceptors rather than the more expensive TIE/FOs, but Omega Ace and Omega Leader are both very apt killers. I hoped to basically "yo-yo" the Gozanti between high speed straight moves and tight turns to keep the big Ghost from getting into range 1 to board me and harass him with my DLT. The TIE/FOs would try and either tie-up his supporting cast or get as many shots off at the Ghost as possible. Still... 10 turns against a group of ships with a minimum of 3 attack dice shots. Things do not look good for the Imperial Homestar Runner...
- Drew - My
goal was to hit the Gozanti hard and not risk having a failed Docking
roll. With the limitations of a big-ship's maneuvers, i figured I had
one chance to Dock. All my firepower was going to be focused on the Gozanti until it was down to just a few HP. Sabine w TLT was to be used to pick off TIEs. The T70 was just because T70s are sweet.
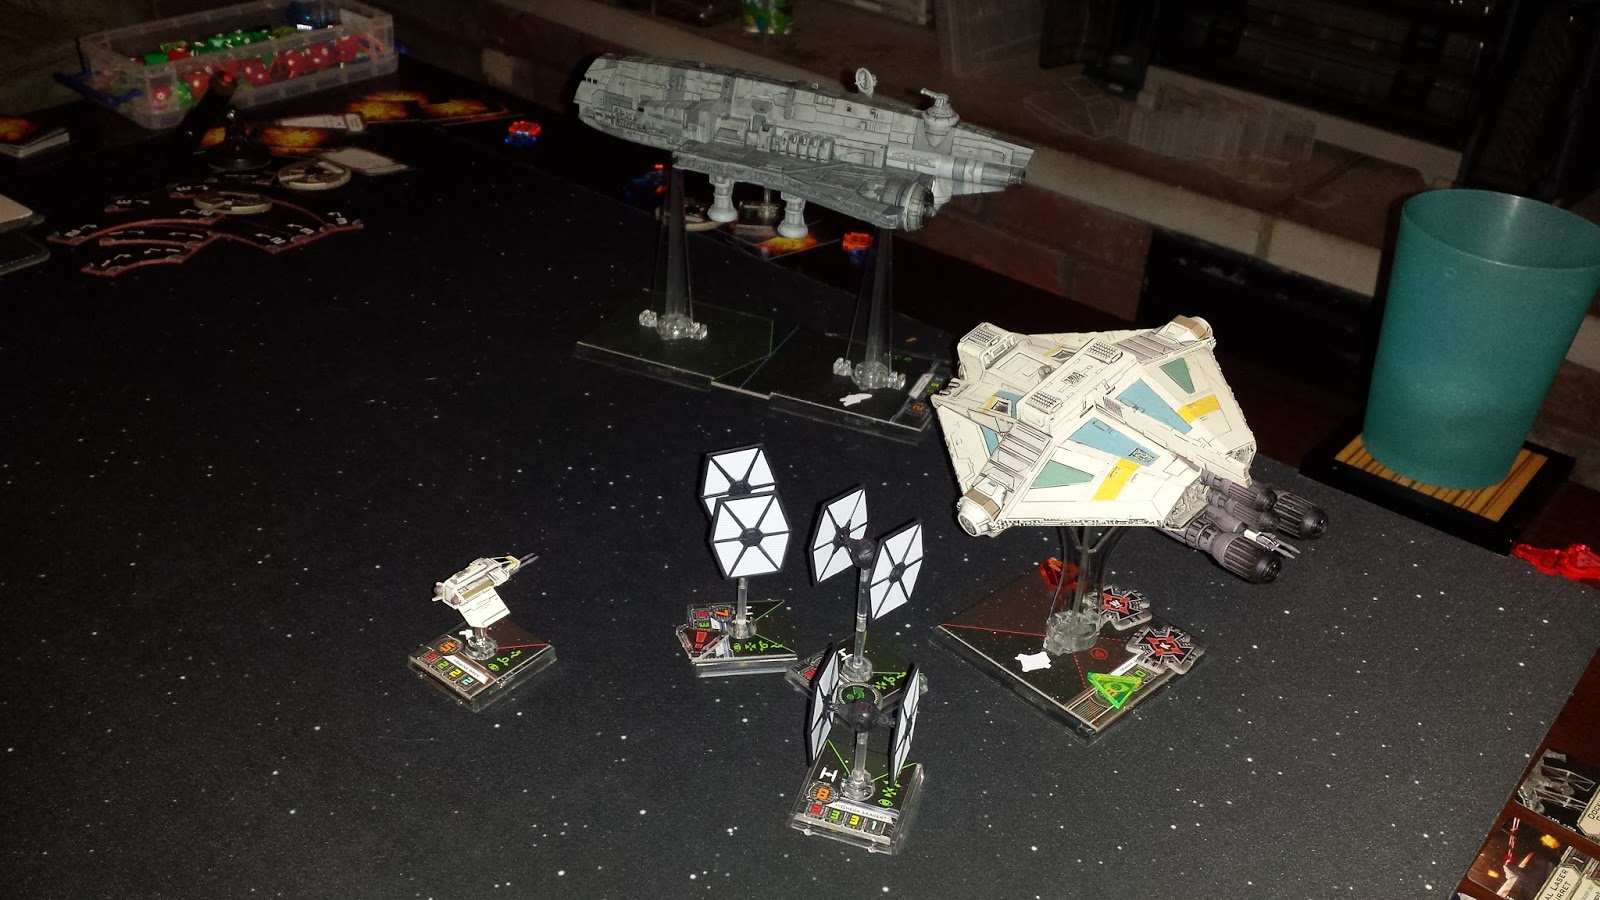
Setup
 |
| Nice Ship you got there... How much you want for it? |
Again, pretty straight forward and no terrain to deal with. I'm already set up to skirt the table edge. Drew? He's going straight for the jugular.
 |
| Who's got two thumbs and is gonna get him some Gozanti? THIS GUY! |
|
Turn 1
 |
| Maybe if we ignore the Rebels, they'll go away... |
The first turn had the typical setup maneuvers. I drove towards to the edge of the map while the Ghost and the T-70 maneuvered to make a run on the aft of the Gozanti. For now, I kept my TIEs docked.
Turn 2
 |
| Excuse Mr. Gozanti, do you have a moment to hear about the Rebellion? |
Turn 2 and the lasers start flying.
I used the
Requiem's Jam action to stress the T-70 to limit its maneuverability and deployed my Epsilon Schmoe and Omega Ace from the rear of the ship (an option I noted in the rules) to give the T-70 something to think about. Drew's Ghost plows forward toward the prize, hoping to get to me before I rack up enough shots on him.
My TIEs and his T-70 trade fire, but both sides dodge fire. My DLT opens up as well, but all blanks and a focus. The Ghost returned fire and shaved off a couple shield pts from the
Requiem. Whew... the dice are hot tonight...
Turn 3
 |
| Who's in who's trap? |
Turn 3 sees to start of the Rebels plan begin to take shape. I take my Ties on a run to try and trap the T-70 using my schmoe-FO to flip behind him (Spd 2 Segnor Flip is awesome) and my Ace to do a green maneuver to keep his PTL-combo going. I jumped the gun with the
Requiem and turned earlier than I wanted, but this put me in jamming range of the Ghost as well (which I knew didn't have many options to shed stress) and I threw Omega Leader into the mix. To my surprise, Drew didn't dive in on the Gozanti, but instead went after the schmoe-FO instead. His Ghost did dive in on me though and...
 |
| Small, but very deadly... |
Deployed Sabine! Oooph... I remember the little ball of death quite well, and this one packed a TLT.
Combat was a two-sided affair. The bucket-load of dice the Ghost can throw whittled my shields away and dealt me two crits!! Both were docking clamp hits, but luckily I had deployed Omega Leader just prior to this. Sabine plunked me for another hit on my hull with her TLT, but no dice on the second shot. The TIE's and the T-70 had a nice laser light show. I shaved off his shields, but he plinked the schmoe-FO's single shield. My Ace ended up shaving some more shields off, but nothing major.
Looked like my manuever combined with the Ghost's guns would end this game pretty quickly.
Turn 4
 |
| Darn pushy Rebel kids... |
Until turn 4... Now all the maneuvering got confusing. I had to figure out a way to get the big Rebel bruiser off the
Requiem. Drew, on the other hand, had to ensure the
Requiem didn't run over the Ghost and get himself positioned for a boarding attempt. That was the plan...
Then my schmoe-FO did a spd 1 tight turn and everything went to hell. Omega Leader did a Spd 2 Flip to get behind the T-70 who was still trying to shave off his stress. My Ace ended up sightseeing because Drew's Ghost turned a direction I hadn't considered. Deprived of shields, I slowed the
Requiem down to hopefully recharge some shields.
 |
| Expect a call from Imperial Insurance for this... |
Drew, on the otherhand, bumped the Ghost right into the
Requiem. And I just had it detailed... Sabine bumped the schmoe-FO and the T-70 lined up nicely in front of Omega Leader.
Shooting was a fairly nasty affair. Now at 5 atk dice boom-stick range, the big guy laid into me once again. My schmoe-FO put a shot into Kanan, but his ability absolutely nerfs basic and FO TIEs. Luckily, though, I was still outside of that crucial Range 1 distance to my front section. No boarding yet again.
Turn 5 (The Turn of Hurt)
 |
| He's on my tail!!! |
At this point, I knew there was no getting away from the Ghost. Sure Jams had hampered progress and maybe forced the Ghost to take some damage in the form of the Adv Sensor/Chopper combo, but I couldn't stop the focus train. On top of that, we were all tangled up and my TIEs weren't doing nearly the amount of damage I had hoped. Turn 5 would see that change.
I decided to try and get my Ace back in the fight with a segnor flip. I kept the schmoe-FO doing spd 1 tight turns, and Omega Leader attempted to dive in on where I hoped the Ghost would be. BUT...
Drew put Sabine in my way and decided the T-70 was done messing around and pulled a Dameron-Bro Talon flip.
 |
| The Bro is strong with this one... |
Not to mention, who taught Kanan how to drive?
 |
| At least take me to dinner first... |
For those keeping count, that's now twice he's bumped me. Despite all this, it was shooting where the hurt would take place. The Ghost unloaded a shotgun blast absolutely savaging the
Requiem's aft. The Ghost is definitely not a gentle lover. Sabine added insult to injury and this was the result...
 |
| Yep, 2 hit points left. That's an auto-win if he can pull off a boarding action. |
I responded by using my schmoe-FO and the Leader to decimate the T-70, first blinding him and then schmoe-FO dealt the final blow.
Turn 6
 |
| Can't catch me! |
Turn 6 and the realization suddenly hits me. If he destroys the
Requiem, the mission ends in a draw. Not a win, a draw. With only 2 hull left, neither the Ghost of the Phantom can really shot me anymore. Matthew Broderick's character in the movie "The Freshman" once said, "there's a kind of freedom in knowing you're totally screwed because you know things can't possibly get any worse."
So change of tactics for me. I only need enough energy to keep the DLT firing so screw the shields. Drew's now on the clock to catch me and I've passed him. He's cleared his stress, but his T-70 is gone. Sabine's still in play, but so are all of my TIEs, who are now pointed the right way.
Maneuvers were pretty straight forward. My TIEs all doved for the Ghost. The Ghost on the otherhand...
 |
| Geez, again? |
Yep, bump number 3. At this point, I'd like to think the
Requiem crew just thinks its fun. Not to mention, Drew was consistently able to avoid a damage from the collision. I mean, the
Requiem just isn't that kind of girl Mr. Ghost...
Unable to get within striking distance for the boarding, Drew had to suffice with stand-off shots with my TIEs. My schmoe-FO found itself in Sabine's crosshairs, but...
 |
| Slippery little bastard isn't he? |
I, meanwhile, hammered home the damage on the Ghost, stripping the shields and dealing some critical damage to the Ghost. After this, time was running out for both of the big ships on the board.
Turn 7
 |
| Despite the hand of God on Sabine, my TIEs defend the Requiem's honor! |
Turn 7 was just like Turn 6 in terms of maneuvering. My TIEs swarmed the Ghost, Sabine flanked them, and the Ghost attempted to get within range one of the forward section. My TIE's clogged up the Ghost's flight path, though, and a maneuver that would have put him in a game-winning position turned into the fourth... THE FOURTH time the Ghost bumped the
Requiem. Well, the TIEs will not let this stand!
Drew's last attempt was to try and nail a few of my TIEs before the feeding frenzy began. Unfortunately, they fell silent when the Omega Leader and Ace laid into the Ghost.
 |
| OH NO! OH NO! OH YEAAAHHH! |
And down went the Ghost. Imperial's win!
Final Thoughts
- Drew (Rebels) - Brutalizing
the Gozanti was the easy part, and probably the only thing that went
well for my strategy. The Ghost hits like a hammer, and Kanan's ability
means he's got Focus to spare on that attack.
Sabine
has huge potential for positioning, even at PS5. The TLT build didn't
help me pick off TIEs however, either because the dice didn't go my way,
or I didn't have enough action economy to TL or Focus both attacks to
ensure hits. Even so, she didn't take a single hit that game, in some
part due to her ability to augment her position without action.
The
T70 was a limp addition to my squad. He didnt really contribute
anything besides a Target for Omega Leader. He pulled off a sweet Talon
Roll, but took a crit that prevented him from taking his Range 1 attack
that round. I would have likely been better off taking a Ywing with
TLTs. That might have survived just as long, but aided me with TIEs
better.
Overall, I should have held the Ghost back another round or two, or come at the Gozanti from the front rather than trying to chase it.
- Tioch (Imperial) - Wow, that was unexpected. If I'm honest, I seriously thought Drew had that one in the bag on turn 3. Not to mention, in the column of things I should have realized from the start, the fact that I didn't have to really keep the Requiem alive was a revelation to me. I could have kept it moving much faster.
The Gozanti is surprisingly fragile, especially against a shotgun like the Ghost. I'm glad I didn't load up the ship with any additional survival mods like optimized generators and shield techs because it really didn't end up being necessary. Once Drew realized that with 2 hull left he couldn't pound me any further, the Gozanti was free to run for the hills. The DLT was such a disappointment this time, though. Without a focus and considering I never really TL'd the entire match, it was just nerfed by Kanan.
The TIE/FOs were better than I expected. Again, Kanan's ability hurt their damage production, but combined with my defense dice waking up, the PS, and that spd 2 flip, they were great flankers. Ace and Leader's abilities were strong, but I never got the production I wanted. Still, quantity over quality I guess. The true star was the Schmoe-FO. He was unexpectedly useful. Blocked ships, soaked up fire, and got a kill to boot. I'm glad I took them over the Interceptors (which I think would have worked much better with the Vector title anyway).
Until next time, you stay classy.