Hey all,
Just dropping by to wipe off the cobwebs on the blog and make sure it hadn't shriveled up from being in the dark for so long. As I mentioned from the outset, I am the father of two wonderful little kids - a toddler and a three month old. As it goes, May has been an absolute whirlwind of pesky adult and life requirements that has pretty well wiped out my time to tell you all my, sniff, true feelings about gaming ::note sarcasm::.
Truthfully, it really has been a rough schedule in terms of any gaming. Besides missing Games Day, I've played some Netrunner with a friend one evening and a quick, anti-climatic scenario of Firestorm Armada. Unfortunately, both events I was either too tired or too distracted to record the proceedings for posterity.
In any case, thanks for those faithful who've been sticking with me. I have some news to share in the coming weeks which should be pretty exciting dealing with Battletech and X-Wing. First up will likely be Battletech, dealing with the Devil's Aces.
Stay classy.
May 24, 2016
May 5, 2016
AAR: Imperial Crackdown Scenario 3B
In belated honor of May the 4th be with you, let's dive back into X-Wing!
The Imperial Crackdown story has been a fun one to play, but now we've come to the final exchange between the brave Rebels and the defiant Imperial Navy. Last time we saw the Imperials shock the Rebels with a victory, severely damaging their wing leader and taking the complete victory.
After the Rebels fled and the crew of the Requiem interrogated the hopeless freighter crew, they now have the location of the Rebel base (no, it isn't on Dantooine...) and the time has come to crush the Rebel menace in this sector once and for all. Not wanting the trouble of transporting the freighter crew to a penal facility, the captain of the Requiem tells his Stormtroopers to "deal with the crew". Such is the way of life in the Outer Rim. Because of the location of the base, the Requiem will not be able to make it in time to deal with the base, but luckily another sister ship, the Suppressor, is close-by and is ready to engage the base.
For the Rebels, the situation couldn't be more dire. Barely able to patch the Ghost back together, Kanan knew that the Empire wouldn't miss the opportunity to crush them. Despite the base commander's confidence in the remote nature of the asteroid base, it would only be a matter of time. The only defense they had were a series of hidden shield generators on small asteroids surrounding the base. If those were destroyed, the Imperial Navy could just bombard the base with impunity without risking troops, but the generators were far too small for a Star Destroyer's heavy turbolasers to hit accurately. It would be a job for a precision fighter strike. That was where he and the remaining Rebel defenders would need to be.
Overview
Scenario 3B sees the Rebels given a 100 pt main force including the Wing Leader and a 60 pt Reinforcement squadron. They will need to stop an Imperial force lead by a Gozanti that can be completely upgraded for no cost and a 100 pt squadron to build from. The two will clash over 3 shield generators, hidden with 3 false ones, to see who wins the entire scenario.
Forces:
Rebels (Tioch)
Setup for the mission was fairly straight forward. As I said in the overview, six obstacle markers were placed on the board by me. Then six sensor echo tokens, randomly and blindly selected were applied to each obstacle. Then Drew got a turn moving at most three of them. After that, we deployed our ships. I decided to deploy near my right flank. Drew deployed in the middle, intent on following a nice lane of obstacles he created so his Gozanti could scan as effectively as possible. Considering the scenario is about the Rebels being desperately backed into the corner, it's looking bad for my Rebels.
Turn 1
Turn 1 was the beginning of each of our strategies. The Suppressor began slow, methodical movements down the obstacle lane while Drew's harassing Juno and Inquisitor drove right towards my Ghost. My plan? To get the Ghost in position for at least a few passing 5 Atk barrages at close range before bugging out. My TLT Y-wing would follow alongside, either to combine fire or hopefully ward off the adventurous Aces.
Unfortunately for me, Drew's placement of the Suppressor put him in range of a sensor echo on Turn 1 and, after scanning it, one of the three precious shield generators. With his first target found, the Suppressor deployed its two scanning ships. Considering he had me outnumbered 2:1, he could scan with impunity.
Shooting was a decidedly Imperial affair. Only able to use the DLT on the Suppressor, Drew reduced the first generator to 1 HP. As I said before, things were not looking good. Albeit that the first half of my objective was in question, I knew the Suppressor had to die if I had any hope of winning this game.
Turn 2
One turn down, one generator surely lost. The Rebels had to make something happen. Movement between each side was mostly setup again. We both were anticipating what Turn 3 would be considering another 60 pts of my group would finally arrive. Drew lined up his Inquisitor and Juno to chase down the Ghost. His two scanning ships, Wampa and Omega Leader, were sent on the case to the second sensor echo. The Suppressor continued its slow march of victory. One could almost hear the Imperial March in the background (if it weren't for the The Force Awakens soundtrack playing).
My Rebels kept to their guns. No sense in freaking out over one generator being found. There were still five echoes on the board - three of which were a significant distance from the Suppressor. Kanan and my Y-wing set up for their attack run and I quickly deployed Ezra hoping another player on the field might force the Imperials to divide their fire. Unfortunately for me, fate had other plans.
And just like that, any hope of my gaining a victory without a table wipe were dashed. Two turns, two discovered generators. For the Imperials, now it would just be a matter of killing my Ghost or finding the lone remaining generator.
Shooting went fairly poorly for me. I barely scratched the Suppressor with my first volley from the Ghost and the TLT was unable to snag a hit on the slippery Inquisitor. On top of that, Ezra couldn't hit either. The Imperials had better odds. While the Suppressor destroyed the first generator, the scanning ships laid into their quarry and damaged it. Also, Juno, the "You're gonna get hit no matter what" ace, and the Inquistor plinked away Kanan's shields.
Turn 3 - Can the base be saved?!
Turn 3 came and boy was I trouble. Two generators found, one destroyed, the Suppressor barely hurt, and I was finally in shotgun distance of Drew's big boy. All the while, I had two Aces on my backside taking bets on who would bag me first. At this point, my only hope is to get out of turn 3 alive and relatively unscathed so my reinforcements could hopefully swing the battle back in my favor.
Movement was an interesting affair. Juno and the Inquisitor stayed on Kanan while the scanning ships were forced to break ranks to try and cover more ground. The Suppressor decided it was tired of getting beat up by that Rebel bully and did his best impression of Ralphie from the Christmas Story, turning in on the Ghost.
My Rebels slowed to attempt to get a good salvo off so the A-Wings could finish the job. Kanan and the Y-wing kept their approach vector, but it was Ezra who had the surprise of the turn!
My maneuver for Ezra landed him squarely on the tail of the Inquisitor. What luck! My ace in the hole was in place yet again. Now if I could only land it...
Which never happened... Shooting was a slugging match. I finally hurt the Suppressor like I should have, dropping its shields and putting a good amount of hurt into it. Unfortunately, Ezra shot and despite a solid showing (2 hits & a crit I believe), the token-happy Inquisitor evaded it with little trouble. The Imperial's response was brutal. Anyone who had a shot, shot the Ghost. I lost shields and I took a good number of hits. Also, the Suppressor jammed the Ghost, limiting my options (and Kanan's ability).
So I survived, and now my spirits were lifted...
The "Raging Greenies" had arrived.
Turn 4 - Where it all went wrong...
If turn 3 was a shooting fest, turn 4 would become an absolute bloodbath. At this point, I had to keep the Ghost alive. Why? Because I forgot to mention that the Suppressor finished off the second generator last turn as well. I lose the Ghost, I lose it all. My only option? Run like hell. A hard thing for such a big ship. I did have the A-wings though, and I had hoped their arrival would force Drew to shift tactics.
It didn't...
Despite running my Ghost at full speed and bring my Y-wing and Ezra in for some cover, the Imperials descended on me. Drew kept his scanners off working as well, knowing that the further they were away, the harder my job was as well. My A-Wings drove hard and fast for the Suppressor though. My plan was to have them Rage at Range 1 and then between an opening green maneuver on turn 5 and their combined wingmans, I'd shed all their stress to do it again.
Shooting was where it would be decided though. Unfortunately, the combined damage from Juno and the Inquisitor was unavoidable and...
Boom! I just couldn't keep the damage from accruing. With my wing leader gone, we decided the match had been a little less than climatic for our tastes and played our the rest of the shooting. My TLT Y-Wing (who's only shot was the big guy), Ezra, and the A-wings absolutely hammered the Suppressor.
Again, the Gozanti falls victim to the combined Rebel guns. Now with both of the starring roles in this space opera dead, it would fall to their supporting actors to decide the battle. Following the Suppressor's destruction, Drew and I decide to play a few more rounds to see if I could table-wipe or he could find the last generator.
Epilogue Turns 5, 6, & 7
Well, on Turn 4, while the big guys were making a jolly-good fireworks presentation, Drew's scanners found a third echo, which turned out to be a dud. On turn 5, we circled into a true dogfight with Drew's Aces tangling with my Y-wing and Ezra (who was emo-crying over the supposed death of Kanan at this point) and my A-wings raced to get the scanners. Blows were traded, but nothing was removed and the scanners found a fourth echo - another dud. WHERE WERE YOU THREE TURNS AGO!!!!
On turn 6, the whole dogfight shifted to my side of the table, racing towards the two echoes closest to my edge. Drew, suffice with his ability to dodge my attacks, basically sent his ships to bracket the remaining echoes. I finally had my survivors in a position to encircle them and limit their movement. Importantly though, no one was in range to scan...
Turn 7 was the decider. Drew contended he couldn't see him winning unless this turn went in his favor. Committing to find the last generator had put him facing the wrong way as my survivors barreled into him. Unfortunately for me, his scanners found the last generator. With little I could do to stop it from being destroyed, I conceded. A pyrrhic, but overall victory for the Imperials!
Final Mission Thoughts
As a whole, Drew and I agreed that the Imperial Crackdown campaign was a pretty good. The plot of it along with structure of the 1st and 2nd scenario were pretty well put together. Unfortunately, we both concluded that this campaign was nothing compared to the "Will of the Empire" campaign from the Imperial Raider expansion, which was good from the start to the finish.
Where Imperial Crackdown fell apart for me was the third scenario. First off, I'm not sure why they decided to make the campaign on three missions long. Except for the GR-75, all the other epic ships thus far have come with a 4 mission campaign which turned out to be pretty fulfilling. Unless they were aiming for symmetry (points for that), there really wasn't any necessity with the story they were telling to not go 4 missions.
On top of that, the 3b scenario we played was an absolute mess. The Rebels intro objective is almost impossible to attain. Sure, we had two generators found in rapid succession, but the Rebels are tasked with chasing down at minimum 2 TIEs and killing the Gozanti, two drastically asymmetrical targets before the Imperials destroy 2 targets. When you factor in the fact that an Imperial player could very easily job the scenario by taking 4 TIEs docked (which would all be scanner ships) and then send the Rebels on a wild goose hunt trying nail down them before 2 generators are destroyed, its impossible for the Aces to win without a table-wipe.
On the flipside, the Imperial objective is much more straight forward. Arguably, our choice of Wing Leader was a pretty easy target to hit with massed firepower, but short of a Fat Han or Super Dash, the Imperials have two fairly even targets to hit to win the "kill 2 gen's and Wing Leader" objective and if they maximized their scanners, the 3 destroyed generators would EASILY be attained. On top of that, the Imperial player has free reign to min-max the hell out of the Gozanti because its upgrades are free. Don't get my wrong, I like asymmetrical scenarios, but this one is just not very well structured.
Now from my review of the 3A scenario, I think it would be a much better scenario, but it's fairly difficult to get to the 3A scenario based on the fact that they second scenario isn't actually that easy to win for the Rebels either. Regardless, I still stand by what I said. It's a good campaign, but the 3B scenario is a letdown to an overall enjoyable experience.
Now let's hope a return of the Heroes of Aturi Cluster campaign can be had. Also, I am in the process of working on a revision of my original homebrewed Crusader-class Scum big ship. I hope to share that in the near future!
Until then, you're all clear kid, now let's blow this thing and go home!
The Imperial Crackdown story has been a fun one to play, but now we've come to the final exchange between the brave Rebels and the defiant Imperial Navy. Last time we saw the Imperials shock the Rebels with a victory, severely damaging their wing leader and taking the complete victory.
After the Rebels fled and the crew of the Requiem interrogated the hopeless freighter crew, they now have the location of the Rebel base (no, it isn't on Dantooine...) and the time has come to crush the Rebel menace in this sector once and for all. Not wanting the trouble of transporting the freighter crew to a penal facility, the captain of the Requiem tells his Stormtroopers to "deal with the crew". Such is the way of life in the Outer Rim. Because of the location of the base, the Requiem will not be able to make it in time to deal with the base, but luckily another sister ship, the Suppressor, is close-by and is ready to engage the base.
For the Rebels, the situation couldn't be more dire. Barely able to patch the Ghost back together, Kanan knew that the Empire wouldn't miss the opportunity to crush them. Despite the base commander's confidence in the remote nature of the asteroid base, it would only be a matter of time. The only defense they had were a series of hidden shield generators on small asteroids surrounding the base. If those were destroyed, the Imperial Navy could just bombard the base with impunity without risking troops, but the generators were far too small for a Star Destroyer's heavy turbolasers to hit accurately. It would be a job for a precision fighter strike. That was where he and the remaining Rebel defenders would need to be.
Overview
Scenario 3B sees the Rebels given a 100 pt main force including the Wing Leader and a 60 pt Reinforcement squadron. They will need to stop an Imperial force lead by a Gozanti that can be completely upgraded for no cost and a 100 pt squadron to build from. The two will clash over 3 shield generators, hidden with 3 false ones, to see who wins the entire scenario.
Forces:
Rebels (Tioch)
- Main Force (100 pts)
- "Kanan Jarrus" VCX-100 w/ "Ghost", "Chopper", Recon Spec., Ion Turret, & Adv. Sensors (Wing Leader)
- "Ezra Bridger" Attack Shuttle w/ PTL, Engine Upgrade, & "Phantom"
- Gold Sqd Pilot Y-Wing w/ TLT
- Reinforcements (60 pts) - "The Raging Greenies"
- Green Sqd Pilot A-Wing w/ "Test Pilot", Chardaan Refit, Wingman, & Rage
- Green Sqd Pilot A-Wing w/ "Test Pilot", Chardaan Refit, Wingman, & Rage
- Green Sqd Pilot A-Wing w/ "Test Pilot", Chardaan Refit, Wingman, & Rage
- Gozanti-class w/ Docking Clamps, DLT, Broadcast Array, Weapons Team, Automated Protocos, Palpatine, & Suppressor title.
- "The Inquisitor" TIE Adv. Proto. w/ PTL, "x1" title, AT
- "Juno Eclipse" TIE Adv. w/ "v1" title & Adv. Targeting Comp.
- "Omega Leader" TIE/FO w/ Juke & Comms Relay
- "Wampa" TIE/LN
- Rebels - The Rebels must destroy the Gozanti and any "scanner" ship before 2 shield generators have been destroyed OR a table wipe of the Imperial forces
- Imperials - Destroy 2 shield generators and the Wing Leader OR Destroy 3 shield generators
- Tioch - So after reading the objectives for this mission a few times, it really set in that I had a mountain to climb in front me. The last two scenarios taught both Drew and I just how to kill the Gozanti, but it was a crap-shoot as to what would be docked. Not to mention, I would have to do that before they found 2 shield generators.
I know I need to get the Gozanti out of the way as quickly as possible though, so I'd need to take Kanan, Ezra, & my TLT Y-wing straight for it. Hopefully Drew's force would all be docked, so I could get to it without much trouble. Still, the TLT Y and Ezra would be my best shot for defending the Ghost till Turn 3.
The crucial group is my reinforcement squadron. I debated either using a pair of Daggers w/ FCS and Manglers or my 3 A-Wings. The versatility of the massed firepower and the ability to possibly chase down the TIE's won out. If the Gozanti was still in good standing, I'd send them against it.
Regardless, I had little faith that I wouldn't end up needing a table wipe. Still, I have to try.
- Drew - Use the Gozanti to build a mega version of the "Imperial Aces & Palp Shuttle" list. Usually this list is 2-3 Imperial Aces such as Soontir, Vader, Omega, Phantom, etc; plus a Lambda Shuttle with Emperor Palpatine aboard.
In this case, I was able to load Palpatine onto the Gozanti along with a potent turret and ability to Jam. Then since I still had 100 pts to play with, I refined my personal ImpAces list (Juno,Inquisitor,Omega,&Wampa). The 2 TIEs were able to be loaded on the Gozanti and gain the Scanner action.
Strategy was to use Juno & Inquisitor as hard hitting (i.e. annoying) dogfighters while the other 2 skirt the edges and find the Transmitters. Unlike the last time I ran the Gozanti, I wouldn't over-commit this time with fast maneuvers. I decided to move slowly and conserve energy for shield boosting.
 |
| The action started faster than I could get a setup image! |
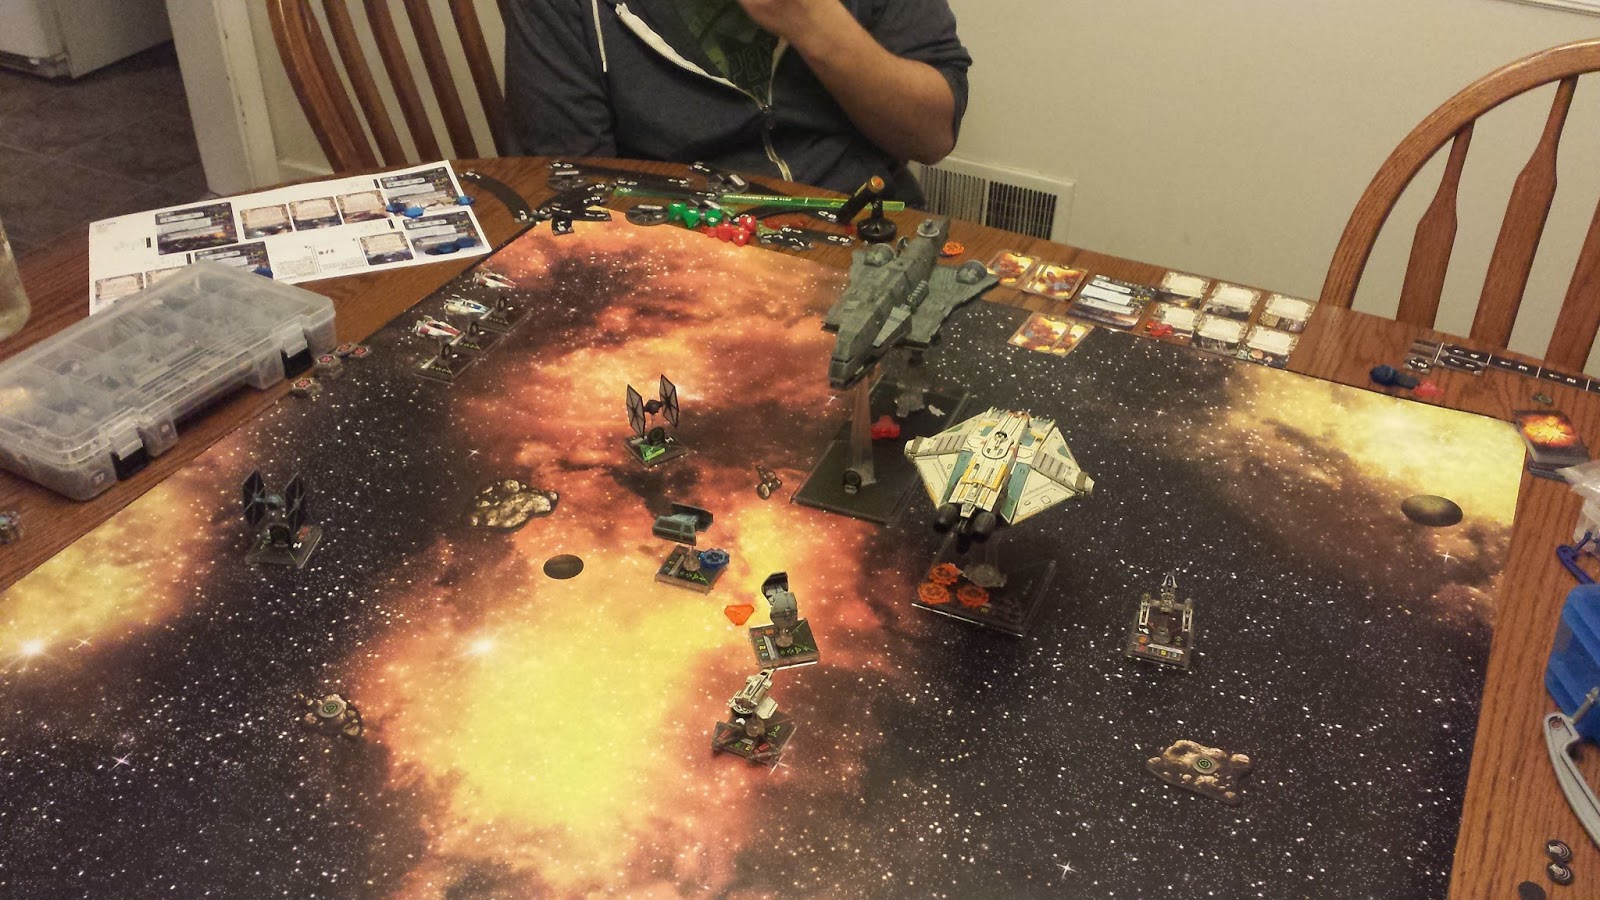
Turn 1
 |
| Target the Suppressor! |
Unfortunately for me, Drew's placement of the Suppressor put him in range of a sensor echo on Turn 1 and, after scanning it, one of the three precious shield generators. With his first target found, the Suppressor deployed its two scanning ships. Considering he had me outnumbered 2:1, he could scan with impunity.
 |
| Go my minions!! |
Turn 2
 |
| The plans begin to unfold... |
My Rebels kept to their guns. No sense in freaking out over one generator being found. There were still five echoes on the board - three of which were a significant distance from the Suppressor. Kanan and my Y-wing set up for their attack run and I quickly deployed Ezra hoping another player on the field might force the Imperials to divide their fire. Unfortunately for me, fate had other plans.
 |
| Second generator sighted Commander! |
Shooting went fairly poorly for me. I barely scratched the Suppressor with my first volley from the Ghost and the TLT was unable to snag a hit on the slippery Inquisitor. On top of that, Ezra couldn't hit either. The Imperials had better odds. While the Suppressor destroyed the first generator, the scanning ships laid into their quarry and damaged it. Also, Juno, the "You're gonna get hit no matter what" ace, and the Inquistor plinked away Kanan's shields.
Turn 3 - Can the base be saved?!
 |
| We've danced this tango before my friend... |
Movement was an interesting affair. Juno and the Inquisitor stayed on Kanan while the scanning ships were forced to break ranks to try and cover more ground. The Suppressor decided it was tired of getting beat up by that Rebel bully and did his best impression of Ralphie from the Christmas Story, turning in on the Ghost.
My Rebels slowed to attempt to get a good salvo off so the A-Wings could finish the job. Kanan and the Y-wing kept their approach vector, but it was Ezra who had the surprise of the turn!
 |
| Well well well... |
Which never happened... Shooting was a slugging match. I finally hurt the Suppressor like I should have, dropping its shields and putting a good amount of hurt into it. Unfortunately, Ezra shot and despite a solid showing (2 hits & a crit I believe), the token-happy Inquisitor evaded it with little trouble. The Imperial's response was brutal. Anyone who had a shot, shot the Ghost. I lost shields and I took a good number of hits. Also, the Suppressor jammed the Ghost, limiting my options (and Kanan's ability).
So I survived, and now my spirits were lifted...
 |
| Clear my sky gentleman... |
Turn 4 - Where it all went wrong...
 |
| Did they arrive in time?! |
It didn't...
Despite running my Ghost at full speed and bring my Y-wing and Ezra in for some cover, the Imperials descended on me. Drew kept his scanners off working as well, knowing that the further they were away, the harder my job was as well. My A-Wings drove hard and fast for the Suppressor though. My plan was to have them Rage at Range 1 and then between an opening green maneuver on turn 5 and their combined wingmans, I'd shed all their stress to do it again.
Shooting was where it would be decided though. Unfortunately, the combined damage from Juno and the Inquisitor was unavoidable and...
 |
| Imperial Victory... |
 |
| Or was it? |
Epilogue Turns 5, 6, & 7
Well, on Turn 4, while the big guys were making a jolly-good fireworks presentation, Drew's scanners found a third echo, which turned out to be a dud. On turn 5, we circled into a true dogfight with Drew's Aces tangling with my Y-wing and Ezra (who was emo-crying over the supposed death of Kanan at this point) and my A-wings raced to get the scanners. Blows were traded, but nothing was removed and the scanners found a fourth echo - another dud. WHERE WERE YOU THREE TURNS AGO!!!!
On turn 6, the whole dogfight shifted to my side of the table, racing towards the two echoes closest to my edge. Drew, suffice with his ability to dodge my attacks, basically sent his ships to bracket the remaining echoes. I finally had my survivors in a position to encircle them and limit their movement. Importantly though, no one was in range to scan...
Turn 7 was the decider. Drew contended he couldn't see him winning unless this turn went in his favor. Committing to find the last generator had put him facing the wrong way as my survivors barreled into him. Unfortunately for me, his scanners found the last generator. With little I could do to stop it from being destroyed, I conceded. A pyrrhic, but overall victory for the Imperials!
Final Mission Thoughts
- Drew (Imperials) - Using 2 TIEs to skirt the edge was successful, but the Gozanti with Palpatine wasn't as useful as I was hoping. Palp has a great ability, but I ended up saving it for the Gozanti itself to use, instead of my Aces. Against low agility ships like the Ghost, ImpAces were brutal and I was able to lay down a lot of damage quickly.
Once the Ghost was eliminated and we opted to continue the scenario, I had 2 Transmitter Tokens left. Due to the current placement, i was able to converge 3 fighters on one of those tokens with the 50/50 shot that it would be the final Transmitter. Luck was literally on my side and I was able to destroy the transmitter with my higher PS Aces before the wave of A-wings closed on them. If that transmitter token had been blank, the next round would have seen a major bloodbath as all 9 fighters converged. - Tioch (Rebels) - To quote Mal Reynolds, "They don't like it when you shoot at them. I figured that out myself".
Oooph! What a beating. Not only did I misjudge a very critical part of the Imperial's objectives, but the dice gods decided I should roll terribly as well. Yes, I got the Gozanti (and the Emperor, TIME PARADOX?!), but in the process I just got manhandled by the Aces with little or nothing I could respond with. I definitely wasn't helped by Drew pushing me to a table-wipe victory in turn 2. I had hoped that the search for the generators would have gone longer because it might have forced Drew to divide his groups. The turn 3 arrival of my A-Wings was really too-little-too-late when I think about it. Yes, I plowed through the Gozanti with surprising ease that turn, but I still had 4 other ships to deal with, all of which were pretty much nigh-impossible to nail down. The fact that so many elements proved useless (Ezra, the TLT, Kanan's ability) was the nail in my coffin.
As a whole, Drew and I agreed that the Imperial Crackdown campaign was a pretty good. The plot of it along with structure of the 1st and 2nd scenario were pretty well put together. Unfortunately, we both concluded that this campaign was nothing compared to the "Will of the Empire" campaign from the Imperial Raider expansion, which was good from the start to the finish.
Where Imperial Crackdown fell apart for me was the third scenario. First off, I'm not sure why they decided to make the campaign on three missions long. Except for the GR-75, all the other epic ships thus far have come with a 4 mission campaign which turned out to be pretty fulfilling. Unless they were aiming for symmetry (points for that), there really wasn't any necessity with the story they were telling to not go 4 missions.
On top of that, the 3b scenario we played was an absolute mess. The Rebels intro objective is almost impossible to attain. Sure, we had two generators found in rapid succession, but the Rebels are tasked with chasing down at minimum 2 TIEs and killing the Gozanti, two drastically asymmetrical targets before the Imperials destroy 2 targets. When you factor in the fact that an Imperial player could very easily job the scenario by taking 4 TIEs docked (which would all be scanner ships) and then send the Rebels on a wild goose hunt trying nail down them before 2 generators are destroyed, its impossible for the Aces to win without a table-wipe.
On the flipside, the Imperial objective is much more straight forward. Arguably, our choice of Wing Leader was a pretty easy target to hit with massed firepower, but short of a Fat Han or Super Dash, the Imperials have two fairly even targets to hit to win the "kill 2 gen's and Wing Leader" objective and if they maximized their scanners, the 3 destroyed generators would EASILY be attained. On top of that, the Imperial player has free reign to min-max the hell out of the Gozanti because its upgrades are free. Don't get my wrong, I like asymmetrical scenarios, but this one is just not very well structured.
Now from my review of the 3A scenario, I think it would be a much better scenario, but it's fairly difficult to get to the 3A scenario based on the fact that they second scenario isn't actually that easy to win for the Rebels either. Regardless, I still stand by what I said. It's a good campaign, but the 3B scenario is a letdown to an overall enjoyable experience.
Now let's hope a return of the Heroes of Aturi Cluster campaign can be had. Also, I am in the process of working on a revision of my original homebrewed Crusader-class Scum big ship. I hope to share that in the near future!
Until then, you're all clear kid, now let's blow this thing and go home!
Subscribe to:
Posts (Atom)